Striping combines several disk drives into a single volume. Striping can be performed through the use of hardware RAID controllers. The GEOM disk subsystem provides software support for disk striping, also known as RAID0, without the need for a RAID disk controller.
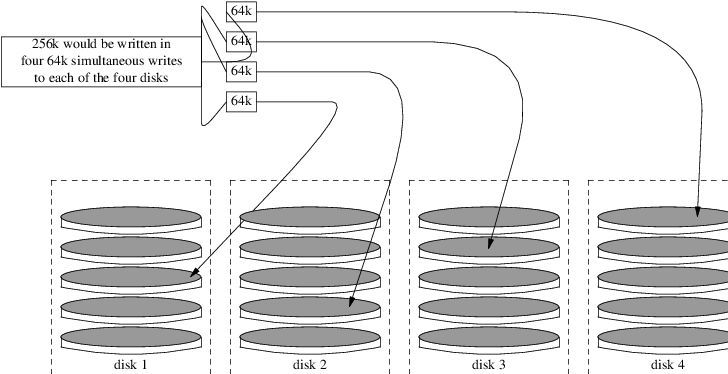
In RAID0, data is split into blocks that are written across all the drives in the array. As seen in the following illustration, instead of having to wait on the system to write 256k to one disk, RAID0 can simultaneously write 64k to each of the four disks in the array, offering superior I/O performance. This performance can be enhanced further by using multiple disk controllers.

Each disk in a RAID0 stripe must be of the same size, since I/O requests are interleaved to read or write to multiple disks in parallel.
Note:
RAID0 does not provide any redundancy. This means that if one disk in the array fails, all of the data on the disks is lost. If the data is important, implement a backup strategy that regularly saves backups to a remote system or device.
The process for creating a software, GEOM-based RAID0 on a FreeBSD system using commodity disks is as follows. Once the stripe is created, refer to gstripe(8) for more information on how to control an existing stripe.
Load the
geom_stripe.komodule:#kldload geom_stripeEnsure that a suitable mount point exists. If this volume will become a root partition, then temporarily use another mount point such as
/mnt.Determine the device names for the disks which will be striped, and create the new stripe device. For example, to stripe two unused and unpartitioned ATA disks with device names of
/dev/ad2and/dev/ad3:#gstripe label -v st0 /dev/ad2 /dev/ad3Metadata value stored on /dev/ad2. Metadata value stored on /dev/ad3. Done.Write a standard label, also known as a partition table, on the new volume and install the default bootstrap code:
#bsdlabel -wB /dev/stripe/st0This process should create two other devices in
/dev/stripein addition tost0. Those includest0aandst0c. At this point, a UFS file system can be created onst0ausingnewfs:#newfs -U /dev/stripe/st0aMany numbers will glide across the screen, and after a few seconds, the process will be complete. The volume has been created and is ready to be mounted.
To manually mount the created disk stripe:
#mount /dev/stripe/st0a /mntTo mount this striped file system automatically during the boot process, place the volume information in
/etc/fstab. In this example, a permanent mount point, namedstripe, is created:#mkdir /stripe#echo "/dev/stripe/st0a /stripe ufs rw 2 2" \>> /etc/fstabThe
geom_stripe.komodule must also be automatically loaded during system initialization, by adding a line to/boot/loader.conf:#echo 'geom_stripe_load="YES"' >> /boot/loader.conf